My Setup
2 node RAC running on RedHat 5.6 using virtual box 4.2
Memory 4G each node
ASM configure
+DG_OCR_VOTE- OCR, vote and asm spfile
+DG01 - Datafiles, redo and controlfile
+FRA01- Archivelog and multiplex redo and controlfile
Old GI Home- /oragridbase/product/11.2.0.3/grid
New GI Home-/oragridbase/product/12.1.0/grid
Software
You can download the software from Oracle download. Once you have downloaded the software extract all zip files.
Create the new Oracle home you will use for the 12c GI installation on all nodes in the cluster.
$mkdir -p /oragridbase/product/12.1.0/grid
$chown oracle:oinstall /oragridbase/product/12.1.0/grid
$chmod -R 775 /oragridbase/product/12.1.0/grid
Create the new Oracle home you will use for the 12c GI installation on all nodes in the cluster.
$mkdir -p /oragridbase/product/12.1.0/grid
$chown oracle:oinstall /oragridbase/product/12.1.0/grid
$chmod -R 775 /oragridbase/product/12.1.0/grid
Pre-Check
Note: During the installation and upgrade most of the precheck that runcluvfy will check is also checked.
$cd to your software location
$./runcluvfy.sh stage -pre crsinst -upgrade -n <node1>,<node2> -rolling -src_crshome <old_crs_home> -dest_crshome <new_crs_home> -dest_version 12.1.0.1.0 -verbose > /home/oracle/pre_crsinst_cluvfy.lst
Example
$/runcluvfy.sh stage -pre crsinst -upgrade -n rac1,rac1 -rolling -src_crshome /oragridbase/product/11.2.0.3/grid -dest_crshome /oragridbase/product/12.1.0/grid -dest_version 12.1.0.1.0 -verbose > /home/oracle/pre_crsinst_cluvfy.lst
The above will create log file /home/oracle/pre_crsinst_cluvfy.lst to review the verbose output from runcluvfy.
Example of runcluvfy output
Checking ASMLib configuration.
Node Name Status
------------------------------------ ------------------------
rac1 passed
rac2 passed
Result: Check for ASMLib configuration passed.
Check: Total memory
Node Name Available Required Status
------------ ------------------------ ------------------------ ----------
rac2 3.7696GB (3952660.0KB) 4GB (4194304.0KB) failed
rac1 3.7696GB (3952660.0KB) 4GB (4194304.0KB) failed
Result: Total memory check failed
Check: Available memory
Node Name Available Required Status
------------ ------------------------ ------------------------ ----------
rac2 2.6788GB (2808916.0KB) 50MB (51200.0KB) passed
rac1 2.3441GB (2457920.0KB) 50MB (51200.0KB) passed
Result: Available memory check passed
Check: Swap space
Node Name Available Required Status
------------ ------------------------ ------------------------ ----------
rac2 3.9062GB (4095992.0KB) 3.7696GB (3952660.0KB) passed
rac1 3.9062GB (4095992.0KB) 3.7696GB (3952660.0KB) passed
Result: Swap space check passed
Check: Free disk space for "rac2:/usr,rac2:/var,rac2:/etc,rac2:/sbin,rac2:/tmp"
Path Node Name Mount point Available Required Status
---------------- ------------ ------------ ------------ ------------ ------------
/usr rac2 / 12.1016GB 1.0635GB passed
/var rac2 / 12.1016GB 1.0635GB passed
/etc rac2 / 12.1016GB 1.0635GB passed
Fixed any failed messages to have a smoother upgrade. You can run cluvfy over and over until you have no more failed messages.
Note DNS Error on VirtualBox Setup
I was able to resolve the following failed message on my RAC virtualbox
PRVF-5636 : The DNS response time for an unreachable node exceeded "15000" ms on following nodes: rac1,rac2
options timeout:1 attempts:1 rotate
Upgrade Grid Infrastructure
1. Execute installer
$./runInstaller
$./runInstaller
2. Enter your Oracle support to download software updates or select to use a pre-download software location. Click next.
In my case I choose to skip software updates.

3. Select upgrade Oracle Grid Infrastructure click next.

4. Select your language and click next.

5. Click the SSH connectivity button to test SSH.

6. Type the Oracle password click test.

7. The SSH test was successful click OK.

8. Click next

9. New feature for RAC 12cR1 is option to create Grid Infrastructure Management Repository database which is a database used to manage operations of Oracle Grid Infrastructure. Select yes and click next.

10. If you have a need to separate ASM duties then select different OS groups for each ASM management. Click next.
In my case I will level all OS groups set to dba.

11. This warning message is due to leaving all the OS groups set to the same group. Click yes.

12. Set the Oracle base and software location and click next.

13. New feature of 12cR1 is the option to provide root password or use sudo to have the installer execute root privilege operations during the installation. Click next.

14. New feature for 12cR1 allows to sequence the automatic execute of root scripts by pool the nodes into batches. Example would be if you had a 6 node cluster and you wanted to complete the upgrade on node 1&2 then 3&4 then 5&6. This is useful so you can control your services in your rolling upgrade. Click next.
In my case since I just have a two node cluster I left both in batch 1.

15. Prerequisite checks will begin.

16. If you have any warning message you can click the fix & check again button to review the

To resolve the resolv.conf integrity error add the following line to the /etc/resolv.conf on both nodes in the cluster.
options timeout:1 attempts:1 rotate
17. Execute the runfixup.sh scripts on each node in the cluster then click OK.

18. Prerequisite checks will execute again.

19. Since this is a virtual box I ignore this physical memory error by selecting ignore all and click next.

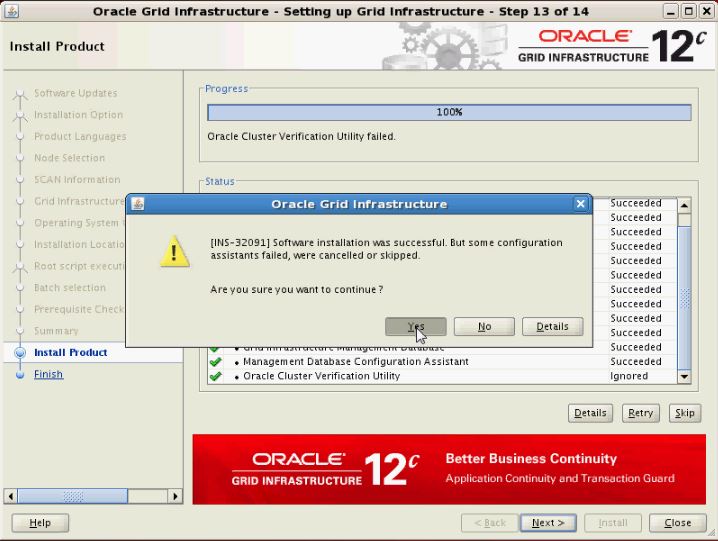
20. This warning message appears because of the ignored error in the prerequisites. Click yes.

21. Review the summary and click install.

22. Installation will begin

23. Click the details button to see detail information about the installation operations.

24. Prompt will appear to click yes to execute the root for each batch.

25. The root operation begin for the nodes in each batch.
In my case I put both nodes in the same batch.

26. Installation will complete click next.

27. I choose to skip the failed Oracle cluster verification utility so I received this warning message click yes.
28. Click close.

Error during installation
This error message I ignored since the SCAN is in my /etc/hosts
INFO: ERROR:
INFO: PRVG-1101 : SCAN name "rac-scan.localdomain" failed to resolve
INFO: ERROR:
INFO: PRVF-4657 : Name resolution setup check for "rac-scan.localdomain" (IP address: 192.168.2.201) failed
INFO: ERROR:
INFO: PRVF-4664 : Found inconsistent name resolution entries for SCAN name "rac-scan.localdomain"
I review this message further when I get time!
Post Installation
I came across an issue after I completed the upgrade of GI the cluster instance did not restart successfully. The issue was that I did not resolve the message during the cluvfy output that stated the /dev/shm needs to be minimum of 2048M. So I reset the /dev/shm by doing the following.
$mount -t tmpfs shmfs -o size=2100m /dev/shm
I also updated the entry in /etc/fstab.
I also restart rac2 to resolve hung crs resource on rac2 node. After node 2 was restarted all is well on both nodes.
To check CRS resources at OS level running the following
$ps -ef | grep -E 'init|d.bin|ocls|sleep|evmlogger|oprocd|diskmon|PID'
rac1.localdomain:{racdb1}:/oragridbase/product/12.1.0/grid/bin >./crsctl stat res -t -init
$ps -ef | grep -E 'init|d.bin|ocls|sleep|evmlogger|oprocd|diskmon|PID'
rac1.localdomain:{racdb1}:/oragridbase/product/12.1.0/grid/bin >./crsctl stat res -t -init
--------------------------------------------------------------------------------
Name Target State Server State details
--------------------------------------------------------------------------------
Cluster Resources
--------------------------------------------------------------------------------
ora.asm
1 ONLINE ONLINE rac1 Started,STABLE
ora.cluster_interconnect.haip
1 ONLINE ONLINE rac1 STABLE
ora.crf
1 ONLINE ONLINE rac1 STABLE
ora.crsd
1 ONLINE ONLINE rac1 STABLE
ora.cssd
1 ONLINE ONLINE rac1 STABLE
ora.cssdmonitor
1 ONLINE ONLINE rac1 STABLE
ora.ctssd
1 ONLINE ONLINE rac1 ACTIVE:0,STABLE
ora.diskmon
1 OFFLINE OFFLINE STABLE
ora.drivers.acfs
1 ONLINE ONLINE rac1 STABLE
ora.evmd
1 ONLINE ONLINE rac1 STABLE
ora.gipcd
1 ONLINE ONLINE rac1 STABLE
ora.gpnpd
1 ONLINE ONLINE rac1 STABLE
ora.mdnsd
1 ONLINE ONLINE rac1 STABLE
ora.storage
1 ONLINE ONLINE rac1 STABLE
--------------------------------------------------------------------------------
rac2.localdomain:{}:/home/oracle >crsctl stat res -init -t
--------------------------------------------------------------------------------
Name Target State Server State details
--------------------------------------------------------------------------------
Cluster Resources
--------------------------------------------------------------------------------
ora.asm
1 ONLINE ONLINE rac2 Started,STABLE
ora.cluster_interconnect.haip
1 ONLINE ONLINE rac2 STABLE
ora.crf
1 ONLINE ONLINE rac2 STABLE
ora.crsd
1 ONLINE ONLINE rac2 STABLE
ora.cssd
1 ONLINE ONLINE rac2 STABLE
ora.cssdmonitor
1 ONLINE ONLINE rac2 STABLE
ora.ctssd
1 ONLINE ONLINE rac2 ACTIVE:0,STABLE
ora.diskmon
1 OFFLINE OFFLINE STABLE
ora.drivers.acfs
1 ONLINE ONLINE rac2 STABLE
ora.evmd
1 ONLINE ONLINE rac2 STABLE
ora.gipcd
1 ONLINE ONLINE rac2 STABLE
ora.gpnpd
1 ONLINE ONLINE rac2 STABLE
ora.mdnsd
1 ONLINE ONLINE rac2 STABLE
ora.storage
1 ONLINE ONLINE rac2 STABLE
--------------------------------------------------------------------------------
Note: If you do not currently have a VirtualBox RAC setup use the links below to get help configuring your VM RAC.
Yury Velikanov - step by step presentation of an Oracle 12c RAC installation to a laptop.
RAC Attack - http://en.wikibooks.org/wiki/RAC_Attack_-_Oracle_Cluster_Database_at_Home
My webpages
Note: If you do not currently have a VirtualBox RAC setup use the links below to get help configuring your VM RAC.
Yury Velikanov - step by step presentation of an Oracle 12c RAC installation to a laptop.
is it possible can we use the 11gR2 crs having 12c database upgrade?
ReplyDeleteNo you would need to upgrade CRS first then the database.
ReplyDeleteHi fellas,
ReplyDeleteThank you so much for this wonderful article really!
If someone want to read more about that vulnerability assessment I think this is the right place for you!