During the import we see that there is no archivelog being generate since there is no redo generation.
After import was complete we can see that no new archivelog where generated.
The import had an elapsed time of 10 minutes with 06 seconds
Note from Oracle Documentation:
With redo logging disabled, the disk space required for redo logs during an Oracle Data Pump import will be smaller. However, to ensure recovery from media failure, the DBA should do an RMAN backup after the import completes.
Even with this parameter specified, there is still redo logging for other operations of Oracle Data Pump. This includes all CREATE and ALTER statements, except CREATE INDEX, and all operations against the master table used by Oracle Data Pump during the import.
This feature reduces the required maintenance of redo logs by DBAs
Upgrading Oracle Database to 12.1.0.1.0 Using DBUA
New Features
I will list out some of the new feature for upgrading your databases to 12c. You can review the complete details of the new feature by clicking the link in the references section.
New Pre-Upgrade Information Tool- A new Pre-Upgrade Information Tool has been created for this release. The preupgrd.sql script replaces the utlu121s.sql script.
Parallel Processing for Database Upgrade- In Oracle Database 12c, the catupgrd.sql Upgrade Utility has been replaced with the new catctl.pl Parallel Upgrade Utility.
DBUA Can Be Restarted During the Upgrade Process- In this release, there are more options for recovering from failures during upgrade and for restarting the upgrade from the point where the failure occurred.
Enhanced Pre-Upgrade and Post-Upgrade Summary Report- DBUA generates HTML reports before and after the upgrade.
Upgrade Database
Make sure you have a full valid database backup.
Make sure your database is in archivelog mode
Take a full backup using RMAN.
Pre-Upgrade Information Tool
Copy SQL scripts preupgrd.sql and utluppkg.sq
$cd <12c_home>/rdbms/admin
$cp preupgrd.sql /home/oracle/scripts/
$cp utluppkg.sql /home/oracle/scripts/
Under your ORACLE_HOME/cfgtoollogs or ORACLE_BASE/cfgtoollogs create directory <db_unique_name>/preupgrade
Execute Pre-Upgrade Scripts
Login to the database you want to upgrade with SYS account
Execute the preupgrd.sql script from the location where you copied the file.
SQL>@preupgrd
Example Output
Review Fixup and Log Files
Example Output from Preupgrade.log
After you have reviewed the scripts, Oracle recommends that you execute preupgrade_fixups.sql on the source database. The preupgrade_fixups.sql script will attempt to resolve issues reported by the preupgrade process.
Execute the preupgrade_fixups.sql before upgrading your database.
SQL>@preupgrade_fixups.sql
Make any manual changes to your database as needed based on the output from the preupgrade.log
3. Select the source Oracle home and the database to be upgraded click next.
4. Prerequisite checks will begin
5. Prerequisite check dialog will show any issue encounter during the checks and will have the option to fix it the validation is fixable. Click next
6. There is an option now to have the upgrade run in parallel so select the upgrade parallelism. Upgrade options can be set to recompile invalid objects during post upgrade. There are other options for Timezone, gather stats and set user tablespace to read-only during upgrade. There is options to change file location if needed. In the custom SQL scripts tab you can set a before and after custom SQL script to be executed.
Click next
7. Managment options can be set to configure EM Express of Cloud Control click next
In my case I left both unchecked.
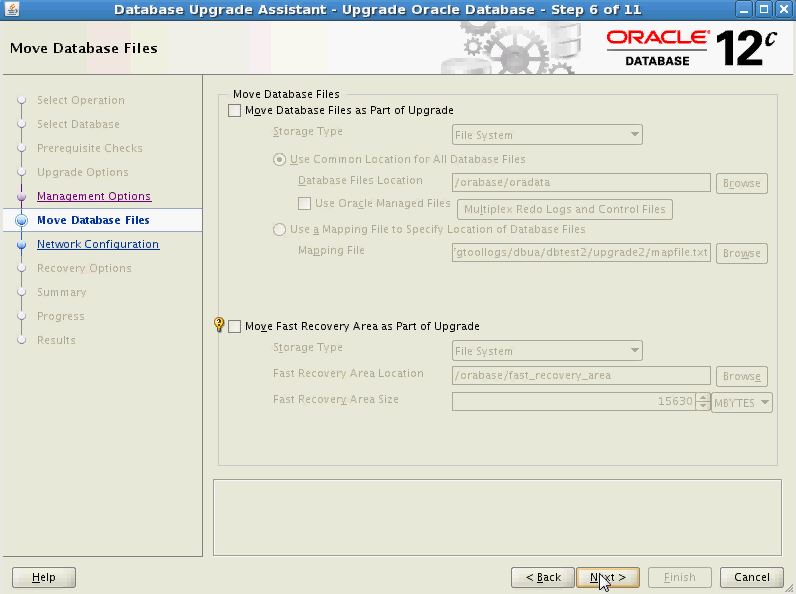
8. In the move database files there are options to move the datafile and flash recovery area as part of the upgrade. Click next
In my case I left blank as I did not need to move my datafiles.
9. Network configuration give the options of registering to any listener running. Click next
In my case the database dbtest2 that I am upgrading is already registered to my default listener.
10. 12c DBUA now has the options of recovering from an upgrade failure. In the recovery options dialog you select different options for recovery. The select are RMAN backup creating a new backup or using existing backup. There is an option for flashback and guaranteed restore point (GPR). There is also the options of having your own backup and recovery strategy. Click next.
In my case I choose RMAN backup with existing RMAN backup.
11. Review summary and click finish
12. Upgrade will being and progress can be monitored.
12.1 Click the activity log button to review the detail progress
12.2 Click the alert log button to review alert log entries during the upgrade process.
13. When upgrade is complete click upgrade results
14. Review results if there were any issues here you would have the option of restoring the database. Click close
15. Database has been upgraded
Once you feel that your upgraded database is good change the compatible to 12.1.0.1.0
SQL>alter system set compatible='12.1.0.1.0' scope=spfile;
SQL>shutdown immediate
SQL>startup
If you want to see this installation in a video demo see below from my YouTube channel.
Upgrade Grid Infrastructure Standalone 11.2.0.3.* to 12.1.0.1.0
My Virtual Box is a RedHat 5.6 running 11.2.0.3 Grid Infrastructure Standalone and two 11.2.0.3 Databases.
Note:
I ran the 12.1.0 Grid Infrastructure Installer and choose the "Upgrade Oracle Grid Infrastructure or Oracle Automatic Storage Management"
Installation
1. Execute ./runInstaller
2. Installer will start note 12c installation requires less swap space.
3. You can add in your Oracle support credentials so the installer can check for any software updates. You can also point to a pre-download location for updates. There is also an option to skip the software download. Click next.
In my case I choose skip software updates
4. Select "Upgrade Oracle Grid Infrastructure or Oracle Automatic Storage Management" click next
5. Left default and click next.
6. Here you can select the privileged operating system groups and click next. This is good if you plan to have different groups for different ASM administration activities.
In my case I left the groups all set to dba.
This is warning message click yes
7. Set the Oracle base and Software location click next
8. New in the Grid Infrastructure installer is you can configure to automatically execute root privilege operations. You can either provide the root password or use sudo. Click next.
9. Prerequisite checks will begin
10. In this case there is one warning message that is fixable. You can click the more details link to get more information about the warning. Since this is fixable click the "Fix & Check Again" button.
10.1 The execute fixup scripts dialog shows the location of the fixup script.
10.2 Open a terminal window as root and execute the fixup script.
10.3 After the fixup script is executed click OK.
10.4 Prerequisite checks will run again if all check are successful then you should move on to step 11 if not repeat step 10 - 10.4
11. Review the summary and click install
12. Installation will begin
12.1 Click the details button to review the details of the installation steps
13. Installation and upgrade was successful click close
Issues encounter after the installation and configuration of GI Standalone 12.1.0
1. After installation and upgrade completed the first thing I did was run a ps -ef and grep for pmon. Nothing was showing online.
2. Executing crsctl check has showed online.
alpddbs002:{}:/oragridbase/product/12.1.0/grid/bin >crsctl check has
CRS-4638: Oracle High Availability Services is online
3. This is new error due to the upgrade since before the upgrade srvctl config asm was showing correctly. More investigation needs to be done into this error. Quick search of MetaLink and Google returns nothing for the "PRCA-1057" error.
alpddbs002:{}:/oragridbase/product/12.1.0/grid/bin >./srvctl config asm
ASM home: /oragridbase/product/12.1.0/grid
PRCA-1057 : Failed to retrieve the password file location used by ASM asm
PRCR-1097 : Resource attribute not found: PWFILE
alpddbs002:{}:/oragridbase/product/12.1.0/grid/bin >showdbs
4. Tried to do a manual start of the ASM instance but received the following error.
SQL> startup
ORA-00119: invalid specification for system parameter LOCAL_LISTENER
ORA-00132: syntax error or unresolved network name 'LISTENER_+ASM'
5. I reviewed the entries in the spfile created during the installation. My 11.2.0.3 spfile was not in the dbs it was in the ASM diskgroup. Seems the upgrade creates a new spfile with some default configuration you can see below. The local_listener entry does not exist in the tnsnames.ora so this is why the ASM instance failed to start.
6. To resolve the issue I updated the local_listener to an address that worked and I was able to start the ASM
(DESCRIPTION=(ADDRESS=(PROTOCOL=TCP)(HOST=alpddbs002)(PORT=1521)))
SQL> startup pfile='/oragridbase/product/12.1.0/grid/dbs/init\+ASM.ora'
ASM instance started
Total System Global Area 1135747072 bytes
Fixed Size 2297344 bytes
Variable Size 1108283904 bytes
ASM Cache 25165824 bytes
ORA-15110: no diskgroups mounted <- This error showed up but then I ran the select statement below and the diskgroups were mounted maybe slow to mount due to vbox disks.
SQL> select name,state from v$asm_diskgroup;
NAME STATE
------------------------------ -----------
FRA01 MOUNTED
DG01 MOUNTED
7. Verification of ASM Clients
SQL> select instance_name,db_name,status,software_version from v$asm_client;
SQL> desc v$asm_diskgroup
Name Null? Type
----------------------------------------- -------- ----------------------------
GROUP_NUMBER NUMBER
NAME VARCHAR2(30)
SECTOR_SIZE NUMBER
BLOCK_SIZE NUMBER
ALLOCATION_UNIT_SIZE NUMBER
STATE VARCHAR2(11)
TYPE VARCHAR2(6)
TOTAL_MB NUMBER
FREE_MB NUMBER
HOT_USED_MB NUMBER
COLD_USED_MB NUMBER
REQUIRED_MIRROR_FREE_MB NUMBER
USABLE_FILE_MB NUMBER
OFFLINE_DISKS NUMBER
COMPATIBILITY VARCHAR2(60)
DATABASE_COMPATIBILITY VARCHAR2(60)
VOTING_FILES VARCHAR2(1)
CON_ID NUMBER <- This is a new column
Update on the new CON_ID column in all the v$asm tables
CON_IDNUMBER
The ID of the container to which the data pertains. Possible values include:
0: This value is used for rows containing data that pertain to the entire CDB. This value is also used for rows in non-CDBs.
1: This value is used for rows containing data that pertain to only the root
n: Where n is the applicable container ID for the rows containing data
Required Task After Oracle Grid Infrastructure Upgrades
 In the first test we should see redolog and archive logs being generated during the import of the SOE schema.