In this demo I will show how to handle different types of RMAN backups in a Multitenant environment.
In a Multitenant environment for cloud supporting data centers we will have container databases on many servers with one to many pluggable databases. These container and pluggable databases will have different database administrators and different SLAs.
I will show how we can backup the container database as a whole or one or many pluggable databases. I will show how with the new database system privilege SYSBACKUP we can separate backup duties and give someone less privileges but still have the capability to perform a full or incremental backup.
I will have a separate blog post on how to recover databases in a Multitenant environment.
CDB = Container Database
PDB = Pluggable Database
Enviroment
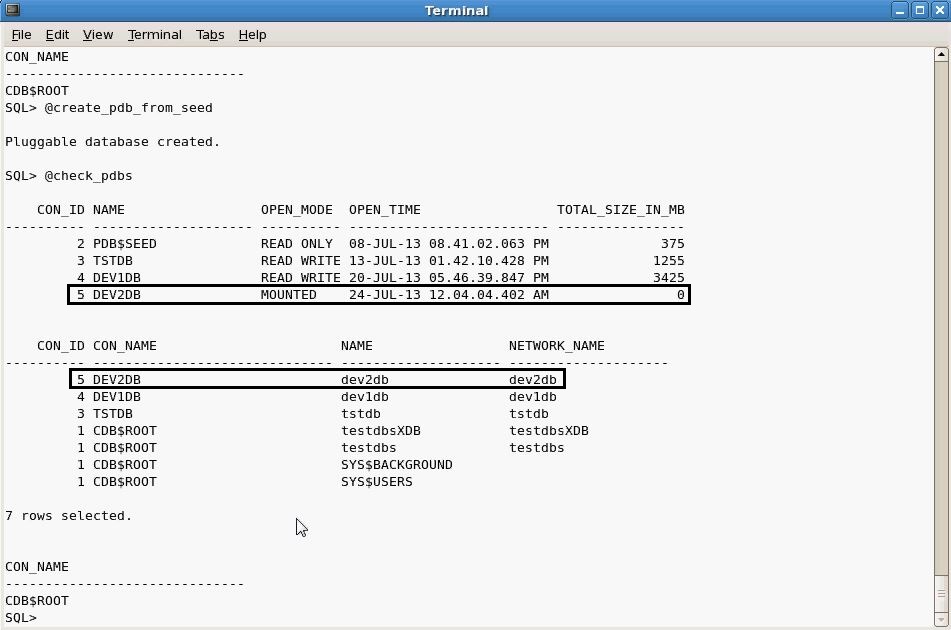
CDB- TESTDBS
PDB- DEV1DB, DEV2DB and TSTDB
Demo
The DBAs name is Jane Doe and she will have access to the database server. She will log in to the server with her own account.
Create OS Group and User
$groupadd backupdba
$useradd -g oinstall -G backupdba jane_doe
$password jane_doe

Create Common User
Common users are database accounts that only exist in a Multitenant environment. Common users are accounts that exist in the root CDB and all PDBs plugged into the CDB. Common users names need to start with C## or c##.
I will create a common user called C##ORADBMAINT which our DBA Jane Doe will have the password to log into the CDB and PDB.
In database 12c there is a new database system privilege called SYSBACKUP. In reviewing the SYSBACKUP database system privilege it has the same system privileges as the database system privilege SYSOPER.
Below you will see CONTAINER=ALL meaning that the statement executes in the root CDB and all PDBs plugged into the CDB.
$sqlplus / as sysdba
SQL>CREATE USER C##ORADBMAINT PROFILE DEFAULT IDENTIFIED BY temp1234 DEFAULT TABLESPACE USERS TEMPORARY TABLESPACE TEMP ACCOUNT UNLOCK CONTAINER=ALL;
SQL>GRANT CONNECT TO C##ORADBMAINT CONTAINER=ALL;
SQL>GRANT SYSBACKUP TO C##ORADBMAINT CONTAINER=ALL;

In the CDB or PDB we can review who has the sysdba, sysoper or sysbackup privileges granted.
- $sqlplus / as sysdba
- SQL>select * from v$pwfile_users;

Backup CDB
We want to backup the container database as a whole. When you backup the CDB the whole CDB and all PDBs plugged into the CDB are backed up.
Our DBA Jane Doe will connect to the database server with her OS account and use the database account C##ORADBMAINT log into RMAN client to create the full CDB backup.
Connect to RMAN
$rman
RMAN>connect target "c##oradbmaint/temp1234 as sysbackup"

RMAN Configuration
I made a view RMAN configuration changes for my environment.
RMAN>CONFIGURE CONTROLFILE AUTOBACKUP ON;
RMAN>CONFIGURE CONTROLFILE AUTOBACKUP FORMAT FOR DEVICE TYPE DISK TO '/orabkup/testdbs/rman/%F';
RMAN>CONFIGURE DEVICE TYPE DISK BACKUP TYPE TO COMPRESSED BACKUPSET PARALLELISM 2;
RMAN>CONFIGURE ARCHIVELOG BACKUP COPIES FOR DEVICE TYPE DISK TO 1; # default
CONFIGURE CHANNEL DEVICE TYPE DISK FORMAT '/orabkup/testdbs/rman/%U' MAXPIECESIZE 5 G;

Start Backup
RMAN>backup database plus archivelog;
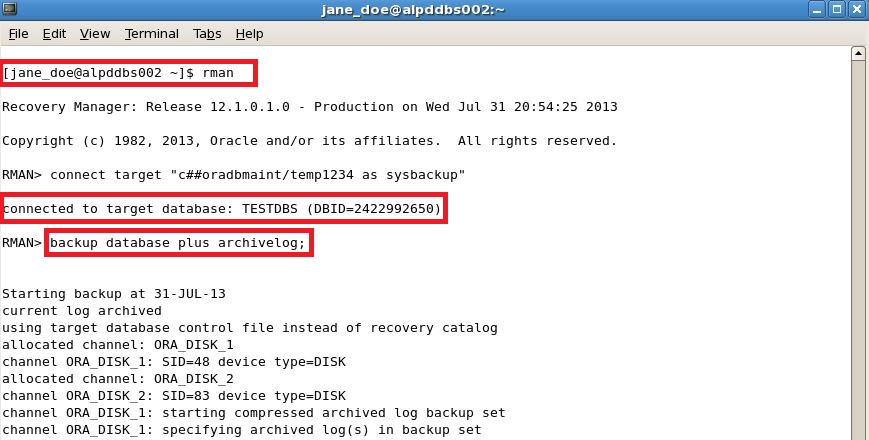
Below you can see that datafiles for CDB testdbs and PDBs dev2db, dev2db and tstdb are backed up.


Backup CDB Root
We want to backup only the root for the CDB database. The root of the CDB contains metadata about the container database. Best practice should be to frequently backup the root. When you backup the root CDB only the datafiles for the root CDB are backed up.
Our DBA Jane Doe will connect to the database server with her OS account and use the database account C##ORADBMAINT log into RMAN client to create the root CDB backup.
Connect to RMAN
$rman
RMAN>connect target "c##oradbmaint/temp1234 as sysbackup"

Start Backup
RMAN>backup database root;

Below you can see that datafiles for only the root CDB are backed up.

Backup PDB
We want to backup only the PDB databases. When you backup the PDB only the datafiles for the PDB are backed up.
Our DBA Jane Doe will connect to the database server with her OS account and use the database account C##ORADBMAINT log into RMAN client to create the full PDB backup.
Connect to RMAN
$rman
RMAN>connect target "c##oradbmaint/temp1234 as sysbackup"

Start Backup
RMAN>backup pluggable database dev1db;

Below you can see that datafiles for only the PDB dev1db are backed up.

Start Backup for More Then One PDB
$rman
RMAN>backup pluggable database dev2db,tstdb;
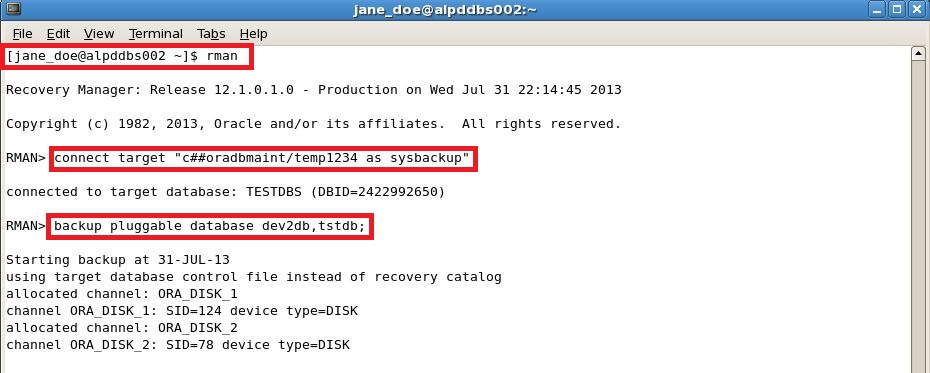
Below you can see that datafiles for only the PDB dev2db and tstdb are backed up.

Note:If you connect directly to the pluggable database and try to issue backup pluggable database you will get the following error.
ORA-07538 Pluggable Database qualifier not allowed when connected to a Pluggable Database

ORA-07538 Pluggable Database qualifier not allowed when connected to a Pluggable Database

To backup the pluggable database connected directly to the pluggable database just issue the following.
$rman
RMAN>connect target "c##oradbmaint/temp1234@dev2db as sysbackup"
RMAN> backup database;
Backup PDB Tablespaces and Datafiles
$rman
RMAN>connect target "c##oradbmaint/temp1234@dev2db as sysbackup"
RMAN> backup database;
Backup PDB Tablespaces and Datafiles
We want to backup PDB tablespaces or datafiles. When you want to backup PDB tablespaces or datafiles you need to connect directly to the PDB database.
Our DBA Jane Doe will connect to the database server with her OS account and use the database account C##ORADBMAINT log into RMAN client to create tablespace and datafile PDB backup for PDB dev2db.


Connect to RMAN
$rman
RMAN>connect target "c##oradbmaint/temp1234@dev2db as sysbackup"

Review Connection and Report Schema
New feature in Database 12c RMAN is the ability to execute SQL command without the need to have SQL '<statement>'.
RMAN>select con_id,name from v$pdbs;
RMAN>report schema;

Start Backup for Tablespace
RMAN>backup tablespace soe_data,users;
Below you can see that datafiles for only the tablespace SOE_DATA and USERS are backed up.

Start Backup for Datafiles
RMAN>backup datafile 15,17;
Below you can see that only datafiles 15 and 17 were backed up.