Now that Oracle 12c has been released we want to consolidate our databases to a Multitenant Architecture.
Note: This blog post will be a work in progress so make sure to subscribe at the bottom of this post so you will receive an email when this post is updated.
Oracle 12c Multitenant Architecture
Now we are in the world of cloud computing and Oracle Database 12c takes the DBAs to the next level of database administration with Multitenant Architecture.
With Multitenant Architecture we will be able to reduce cost, deploy faster, easy management, secure separation of duties and fewer database upgrades and patches.
The Multitenant Architecture option enables you to consolidate data and code without altering existing schemas or applications. The PDB behaves the same as a non-CDB as seen from a client connection.
In this blog post I will show the different methods of consolidating to Oracle Database 12c Multitenant. I will show the complete process from begin to end.
How my environment looks before consolidation:
Non-Production Oracle Database Server before Oracle 12c

My planned environment after consolidation
Non-Production Oracle Database Server after Oracle 12c

Consolidation Method I will be testing

What I am going to do is consolidate my 3 11.2.0.3 databases to Oracle 12c CDB. I am going to use 3 different methods to consolidate using Enterprise Manager 12c where applicable.
Method 1
Upgrade 11.2.0.3 database to 12.1.0.1 and adopt non-CDB as a PDB using Enterprise Manger 12c
Oracle calls this adoption "Upgrade-and-Plug-in"
Use the navigation links below to navigate within this blog post.
Steps
1. Upgrade Grid Infrastructure Standalone 11.2.0.3 to 12.1.0.1
2. Install Oracle Database 12c Software only
3. Upgrade Oracle Database 11.2.0.3 to 12.1.0.1
4. Create 12.1.0.1 Container Database
5. Add CDB to Enterprise Manger
6. Provision non-CDB to PDB using Enterprise Manger 12c
7. Drop the non-CDB database
8. Take RMAN backup of your new PDB using Enterprise Manager
Oracle calls this adoption "Data Pump adoption approach"
Use the navigation links below to navigate within this blog post.
Steps
1. Upgrade Grid Infrastructure Standalone 11.2.0.3 to 12.1.0.1
2. Install Oracle Database 12c Software only
3. Create 12.1.0.1 Container Database
4. Add CDB to Enterprise Manger
5. Provision non-CDB to PDB with Data Pump Transportable using Enterprise Manger 12c
6. Drop the non-CDB database
7. Take RMAN backup of your new PDB using Enterprise Manager
Note: Coming soon!
GoldenGate 12.1.2 has been release I will be blogging soon.
Oracle calls this adoption "Upgrade-and-Plug-in"
Use the navigation links below to navigate within this blog post.
Steps
1. Upgrade Grid Infrastructure Standalone 11.2.0.3 to 12.1.0.1
2. Install Oracle Database 12c Software only
3. Upgrade Oracle Database 11.2.0.3 to 12.1.0.1
4. Create 12.1.0.1 Container Database
5. Add CDB to Enterprise Manger
6. Provision non-CDB to PDB using Enterprise Manger 12c
7. Drop the non-CDB database
8. Take RMAN backup of your new PDB using Enterprise Manager
Method 2
Use Data Pump to export / import to Adopt non-CDB Content to PDB using Enterprise Manger 12cOracle calls this adoption "Data Pump adoption approach"
Use the navigation links below to navigate within this blog post.
Steps
1. Upgrade Grid Infrastructure Standalone 11.2.0.3 to 12.1.0.1
2. Install Oracle Database 12c Software only
3. Create 12.1.0.1 Container Database
4. Add CDB to Enterprise Manger
5. Provision non-CDB to PDB with Data Pump Transportable using Enterprise Manger 12c
6. Drop the non-CDB database
7. Take RMAN backup of your new PDB using Enterprise Manager
Method 3
Use Oracle GoldenGate to move application schema from 11.2.0.3 to 12.1.0.1Note: Coming soon!
GoldenGate 12.1.2 has been release I will be blogging soon.
Upgrade Grid Infrastructure Standalone 11.2.0.3 to 12.1.0.1
1. Start installation
$cd <location_of_GI12c_dowload>
$./runInstaller
2. Installer will start note 12c installation requires less swap space.

3. You can add in your Oracle support credentials so the installer can check for any software updates. You can also point to a pre-download location for updates. There is also an option to skip the software download. Click next.
In my case I choose skip software updates

4. Select "Upgrade Oracle Grid Infrastructure or Oracle Automatic Storage Management" click next

5. Left default and click next.

6. Here you can select the privileged operating system groups and click next. This is good if you plan to have different groups for different ASM administration activities.
In my case I left the groups all set to dba.

This is warning message click yes

7. Set the Oracle base and Software location click next

8. New in the Grid Infrastructure installer is you can configure to automatically execute root privilege operations. You can either provide the root password or use sudo. Click next.

9. Prerequisite checks will begin

10. In this case there is one warning message that is fixable. You can click the more details link to get more information about the warning. Since this is fixable click the "Fix & Check Again" button.

10.1 The execute fixup scripts dialog shows the location of the fixup script.

10.2 Open a terminal window as root and execute the fixup script.

10.3 After the fixup script is executed click OK.

10.4 Prerequisite checks will run again if all check are successful then you should move on to step 11 if not repeat step 10 - 10.4

11. Review the summary and click install

12. Installation will begin

12.1 Click the details button to review the details of the installation steps

13. Installation and upgrade was successful click close

Issues encounter after the installation and configuration of GI Standalone 12.1.0
1. After installation and upgrade completed the first thing I did was run a ps -ef and grep for pmon. Nothing was showing online.
2. Executing crsctl check has showed online.
alpddbs002:{}:/oragridbase/product/12.1.0/grid/bin >crsctl check has
CRS-4638: Oracle High Availability Services is online
3. This is new error due to the upgrade since before the upgrade srvctl config asm was showing correctly. More investigation needs to be done into this error. Quick search of MetaLink and Google returns nothing for the "PRCA-1057" error.
alpddbs002:{}:/oragridbase/product/12.1.0/grid/bin >./srvctl config asm
ASM home: /oragridbase/product/12.1.0/grid
PRCA-1057 : Failed to retrieve the password file location used by ASM asm
PRCR-1097 : Resource attribute not found: PWFILE
alpddbs002:{}:/oragridbase/product/12.1.0/grid/bin >showdbs
4. Tried to do a manual start of the ASM instance but received the following error.
SQL> startup
ORA-00119: invalid specification for system parameter LOCAL_LISTENER
ORA-00132: syntax error or unresolved network name 'LISTENER_+ASM'
5. I reviewed the entries in the spfile created during the installation. My 11.2.0.3 spfile was not in the dbs it was in the ASM diskgroup. Seems the upgrade creates a new spfile with some default configuration you can see below. The local_listener entry does not exist in the tnsnames.ora so this is why the ASM instance failed to start.

6. To resolve the issue I updated the local_listener to an address that worked and I was able to start the ASM
(DESCRIPTION=(ADDRESS=(PROTOCOL=TCP)(HOST=alpddbs002)(PORT=1521)))
SQL> startup pfile='/oragridbase/product/12.1.0/grid/dbs/init\+ASM.ora'
ASM instance started
Total System Global Area 1135747072 bytes
Fixed Size 2297344 bytes
Variable Size 1108283904 bytes
ASM Cache 25165824 bytes
ORA-15110: no diskgroups mounted <- This error showed up but then I ran the select statement below and the diskgroups were mounted maybe slow to mount due to vbox disks.
SQL> select name,state from v$asm_diskgroup;
NAME STATE
------------------------------ -----------
FRA01 MOUNTED
DG01 MOUNTED
7. Verification of ASM Clients
SQL> select instance_name,db_name,status,software_version from v$asm_client;
INSTANCE_NAME DB_NAME
---------------------------------------------------------------- --------
STATUS SOFTWARE_VERSION
------------ ------------------------------------------------------------
dbtest1 dbtest1
CONNECTED 11.2.0.3.0
dbtest2 dbtest2
CONNECTED 11.2.0.3.0
dbtest3 dbtest3
CONNECTED 11.2.0.3.0
+ASM +ASM
CONNECTED 12.1.0.1.0
Install Oracle Database 12c Software only
1. Start installation
$cd <location_of_DB12c_dowload>
$./runInstaller
$cd <location_of_DB12c_dowload>
$./runInstaller
2. Note the installer only needs 150 MB for swap that is an improvement from early version of the installer.

3. To configure security updates which is recommend put your email address from Oracle support and check the box and add you email. Click next.
In my case I left this blank and clicked next.
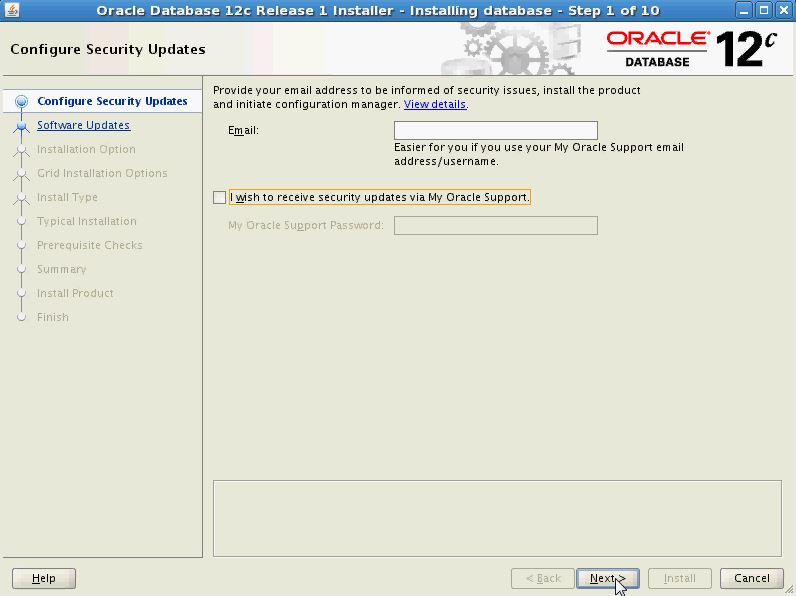
3.1 In my case I said yes

4. You can add in your Oracle support credentials so the installer can check for any software updates. You can also point to a pre-download location for updates. There is also an option to skip the software download. Click next.


4. You can add in your Oracle support credentials so the installer can check for any software updates. You can also point to a pre-download location for updates. There is also an option to skip the software download. Click next.
In my case I choose skip software updates

5. Select install database software only

6. Select single instance database installation click next

7. Select your languages click next
In my case I left default

8. Select the database edition click next
In my case I select Enterprise Edition

9. Set Oracle base and software location and click next

10. Here select the privileged operating system groups and click next. This is good if you plan to have different groups for different database activities.
In my case I left the groups all set to dba.

11. Prerequisite checks will begin

12. Review summary and click install

13. Installation will begin

13.1 Click the details button to see the installation details

14. When prompted execute the root.sh script do not click OK until you have executed the root.sh

15. Open a terminal widow with root privilege execute the root.sh script in the new installed Oracle software home.

16. Once the root.sh completes execution click OK.

17. Installation is complete click close

Make sure you have a full valid database backup.
- Make sure your database is in archivelog mode
- Take a full backup using RMAN.
Copy SQL scripts preupgrd.sql and utluppkg.sq
- $cd <12c_home>/rdbms/admin
- $cp preupgrd.sql /home/oracle/scripts/
- $cp utluppkg.sql /home/oracle/scripts/
- Under your ORACLE_HOME/cfgtoollogs or ORACLE_BASE/cfgtoollogs create directory <db_unique_name>/preupgrade
Execute Pre-Upgrade Scripts
- Login to the database you want to upgrade with SYS account
- Execute the preupgrd.sql script from the location where you copied the file.
- SQL>@preupgrd

Review Fixup and Log Files
Example Output from Preupgrade.log


After you have reviewed the scripts, Oracle recommends that you execute preupgrade_fixups.sql on the source database. The preupgrade_fixups.sql script will attempt to resolve issues reported by the preupgrade process.
Execute the preupgrade_fixups.sql before upgrading your database.
SQL>@preupgrade_fixups.sql
Make any manual changes to your database as needed based on the output from the preupgrade.log
Upgrade Database Using DBUA
1. Launch DBU
$cd $ORACLE_HOME /bin
$./dbua
2. Select upgrade Oracle database click next

3. Select the source Oracle home and the database to be upgraded click next.

4. Prerequisite checks will begin

5. Prerequisite check dialog will show any issue encounter during the checks and will have the option to fix it the validation is fixable. Click next

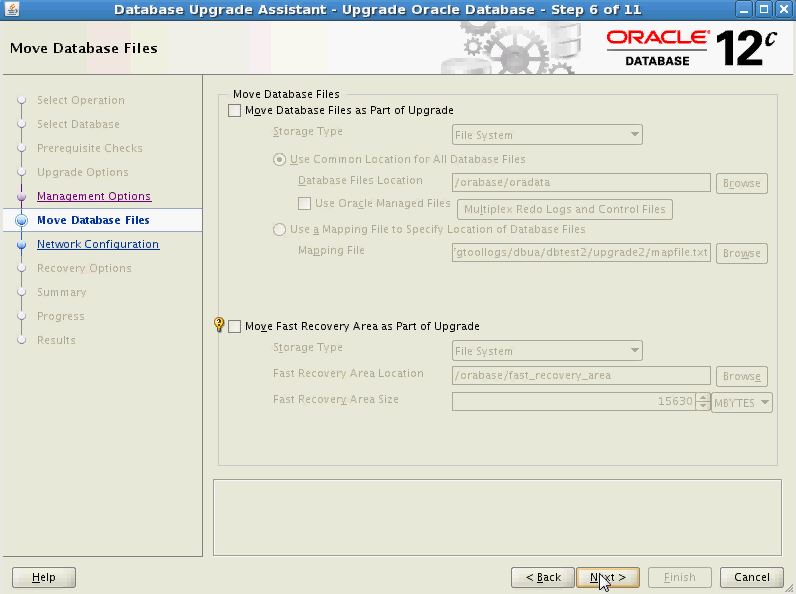
6. There is an option now to have the upgrade run in parallel so select the upgrade parallelism. Upgrade options can be set to recompile invalid objects during post upgrade. There are other options for Timezone, gather stats and set user tablespace to read-only during upgrade. There is options to change file location if needed. In the custom SQL scripts tab you can set a before and after custom SQL script to be executed.
Click next

7. Management options can be set to configure EM Express of Cloud Control click next
In my case I left both unchecked.

In my case I left blank as I did not need to move my datafiles.
In my case the database dbtest2 that I am upgrading is already registered to my default listener.

In my case I choose RMAN backup with existing RMAN backup.


12.1 Click the activity log button to review the detail progress

12.2 Click the alert log button to review alert log entries during the upgrade process.

13. When upgrade is complete click upgrade results

14. Review results if there were any issues here you would have the option of restoring the database. Click close

15. Database has been upgraded

Once you feel that your upgraded database is good change the compatible to 12.1.0.1.0
SQL>alter system set compatible='12.1.0.1.0' scope=spfile;
SQL>shutdown immediate
SQL>startup
Create 12.1.0.1 Container Database
1. Launch DBCA
$cd $ORACLE_HOME/bin
$./dbca
$cd $ORACLE_HOME/bin
$./dbca
2. Select create database click next

3. Here you can select to create database with default options or choose advance mode to have more control over how the database is created. Click next
In my case I choose advance mode.

In my case I like to choose custom database. Note: the template called testdbs is one I created not one of Oracle's templates.

In my case I choose to create CDB empty.

In my case I left blank.

Since this is a test lab we are not concern with the password.


See 9.1 for multiplex of redo and controlfile.
Click next.
In my case I am going to use ASM for both the datafiles and recovery related files

In my case I provided to different ASM diskgroups.


In my case I will not set these security options.

Set memory option if you will use AMM or preset SGA/PGA

Set block size and processes

Set the character set as needed note best practice is to set Unicode (AL32UTF8)

Set the connection mode to be used
Once complete with the initialization parameters click next

Select create database and click next


Add CDB to Enterprise Manger
1. Login to OEM
2. Click setup>add target>add targets manually


6. Click on the image  to configure the target
to configure the target7. Set the dbsnmp password and click test connection.
If you receive a message that the dbsnmp account is locked click the change dbsnmp password button and set a new password to unlock account.


 this means the target has been configured
10. Click next

11. Click save


Provision non-CDB to pluggable database using Enterprise Manger 12c
The non-CDB must already be 12.1.0.1 and above.
1. Login to OEM and go to the container testdbs database home page.
3. Click on Oracle Database>Provisioning>Provision Pluggable Databases>


4. Select migrate existing databases and click launch.

5. Select plug as a PDB set your Oracle home credentials and click next.

6. Click add and select the database we are going to adopt then click select.

7. Set the database and host credentials, set the export directory, fill in the destination information, select datafile location and import directory then click next.
In my case I used the same directory for export and import but these directories can be different.
I set the name of the PDB to tstdb but you can leave the PDB name the same as the non-CDB.

8. Pre-check process will begin...

9. When validation is complete click close.

10. Give the job a new and description then set the schedule and click next.
In my case I left the name as is and the schedule as immediately.

11. Review your migration job and click submit.

12. Confirmation of job successful submitted will pop up click view job.

13. You can review the procedure activity to see the status of each step in the process. Expand the procedure steps and select the step. In the step details you can review the details of the step or steps you have selected.

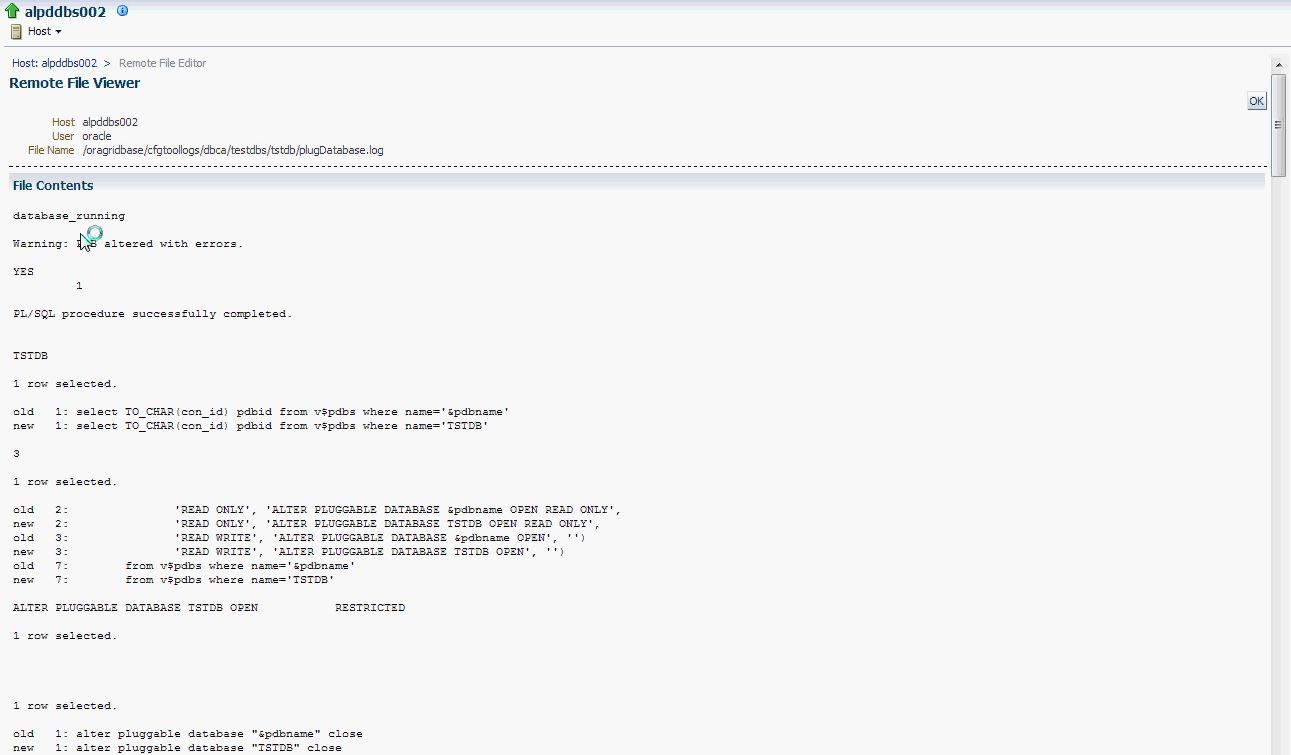
14. In the below screenshot you can see in the step details it list the logs that are being created for the procedure step "Create Pluggable Database Step" click the link of the log to see what is written into the log.

15. Here we can see the output of the log as the step is running.
16. To get back to the job activity click Enterprise>Provisioning and Patching>Procedure Activity.

17. Click the job name

18. When the job completes all procedure step will show completed.

Note if you see an  then these means the step is skipped because it did not need to execute.
then these means the step is skipped because it did not need to execute.
19. We can now see the non-CDB has been plugged into the CDB and added as a target to Enterprise Manager.

20. From the container home page we can see information about the pluggable database.

21. Check PDB from SQLPLUS Connected to Root Container
SQL> select con_id,name,open_mode,open_time,ceil(total_size)/1024/1024 total_size_in_mb from v$pdbs;
22. Check active services
SQL>select con_id,con_name,name,network_name from v$active_services;

23. Check services from Listener
LSNRCTL>status

Remove database target from Enterprise Manager 12c
SQL>shutdown immediate;
SQL>startup mount exclusive restrict;
SQL>drop database;
Take RMAN backup of your new PDB using Enterprise Manager
1. Login to OEM.
2. Go to the container database home page.
3. Select Availability>Backup & Recovery>Schedule Backup

4. Select pluggable database set your host credentials then click schedule customized backup

5. Click the add button to select the PDB

6. Select the PDB and click select

7. Click next

8. Backup type is full in my case I want to delete the archivelog when the backup completes as well as any obsolete backups then Click next

9. You can leave the default settings or update as needed then click next

10. Set the schedule for the backup job in my case I want to run immediately then click next.

Once you complete the review click submit job.

12. Click view job

13. Click the running link for the backup step to review execution.

14. You can monitor the RMAN script execution output as needed.

15. After the backup is successful you can review the output to see everything that was backed up. The PDB backup is faster then a whole database backup as the whole database backup will backup the CDB and all PDBs.

Provision non-CDB to Pluggable Database with Data Pump Transportable using Enterprise Manger 12c
Note:
The non-CDB must be 11.2.0.3+.
The compatible parameter must be set to 11.2.0.3.0
The character set for the non-cdb must match the cdb character set.
This will cause an brief outage on user schema tablespaces as tablespaces on the source database are placed in read-only mode.
1. Check the character set and the compatible parameter in the 11.2.0.3 database.
- SQL>SHOW PARAMETER COMPATIBLE
- SQL>select * from NLS_DATABASE_PARAMETERS where parameter ='NLS_CHARACTERSET';
3. Click on Oracle Database>Provisioning>Provision Pluggable Databases>

4. Select migrate existing databases and click launch.

5. Set database login credential click login.


7. Click add and select the database we are going to adopt then click select.

8. Set the database and host credentials, set the export directory, fill in the destination information, select datafile location and import directory then click next. Set the object exists action to take.
In my case I used the same directory for export and import but these directories can be different.
I set the name of the PDB to dev1db but you can leave the PDB name the same as the non-CDB.

9. Pre-check process will begin...

10. When validation is complete click close.

11. Give the job a new and description then set the schedule and click next.
In my case I left the name as is and the schedule as immediately.

12. Review your migration job and click submit.

13. Confirmation of job successful submitted will pop up click view job.

14. You can review the procedure activity to see the status of each step in the process. Expand the procedure steps and select the step. In the step details you can review the details of the step or steps you have selected.

15. In the below screenshot you can see in the step details it list the logs that are being created for the procedure step "Create Pluggable Database Step" click the link of the log to see what is written into the log.

16. Here we can see the output of the log as the step is running.

17. To get back to the job activity click Enterprise>Provisioning and Patching>Procedure Activity. Click the job name.

18. On the server we can see the files that are created on the directory we specified.

19. When the job completes all procedure step will show completed.

20. Select the verification and cleanup step and you can see a compare report of all schema objects in the new PDB.

21. From the container home page we can see information about the pluggable database.

22. From the server we log into the container database and can see the new PDB database and active service.

If you want to learn about different Oracle 12c products and features below are good links.
Hi Javier
ReplyDeleteHow are you colleague ?. Great Article!!. My name is Joel Pérez ( Oracle ACE Director ), my e-mail is ing_joelperez@yahoo.com.ar
Write to me to talk to you something interesting about this article.
I hope your e-mail.
Thanks
Joel Pérez
Oracle ACE Director
Great entry Javier ! Really great !
ReplyDeleteAll the best,
George
Thank you more is coming!
ReplyDeletegteat entry awesome :)
ReplyDeletePortable Apps
Thank you Javier
ReplyDelete